
Integrations
Publish from Claude
Ask Claude to build a page or a site, and have it put it online in your Droply account.
Droply connects to Claude as a connector. Once it is connected, Claude can create a site, publish a single page or a whole folder of files to it, and give you the live link. Everything it publishes lands in your account, next to the sites you uploaded yourself.
The address to give Claude:
https://droply.host/mcp
Before you start
- Works on every plan, Free included. Your plan's limits still apply, such as how many sites you can have and your storage, and an account can publish from an assistant up to 30 times an hour.
- A Claude account. Claude's Free plan can add one custom connector; paid Claude plans can add more. On a Claude Team or Enterprise plan, an owner may need to add the connector for your organization first.
Connect Claude.ai or Claude Desktop
It takes about a minute. The screens below are from Claude.ai, and Claude Desktop looks the same.
1. Open Settings
Click your name at the bottom left of Claude, then Settings.
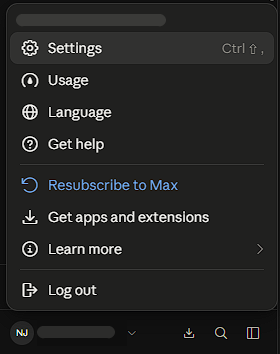
2. Open Connectors and click Add
Choose Connectors in the sidebar, then click Add at the top right.
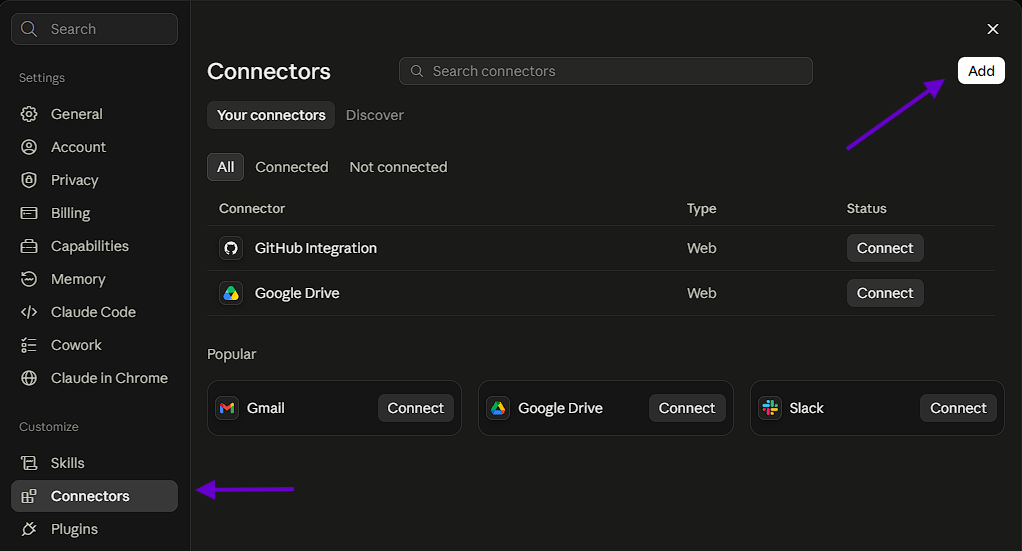
Don't see Add? Some versions of Claude keep it under Customize, Connectors, then + and Add custom connector. Every step after it is the same.
3. Name it and paste the address
Name the connector Droply, paste https://droply.host/mcp as the address, and click
Continue.
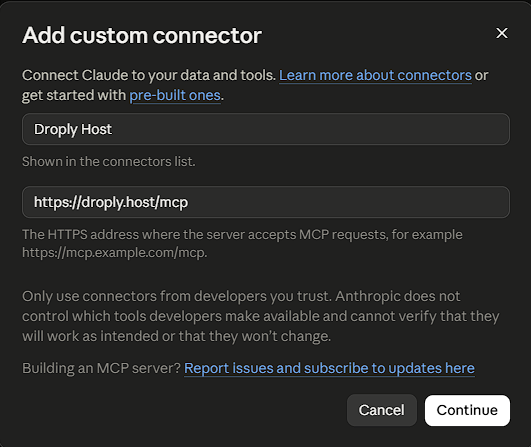
4. Keep the detected options, then Add and Connect
Claude checks Droply and picks the sign-in method by itself. Leave Sign in now and Register automatically selected, click Add, and then click Connect on the connector that appears.
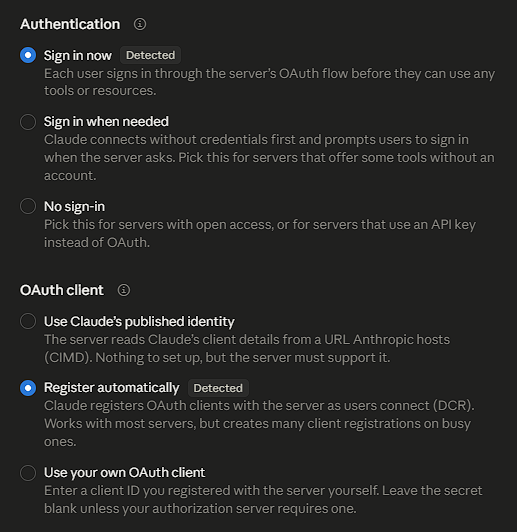
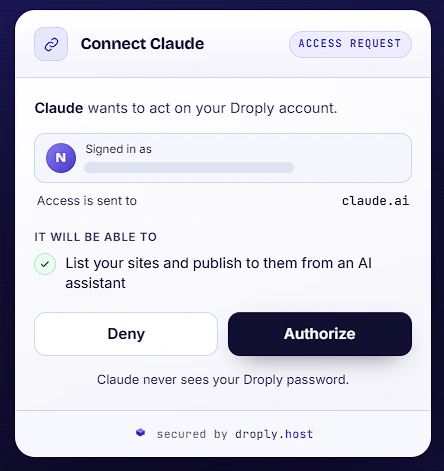
5. Sign in to Droply and authorize
Droply opens in your browser. Sign in if you are asked to, check that the account shown is the one
you want Claude to publish to, and click Authorize. The screen also shows where access is
sent: claude.ai.
6. Choose which tools need your approval
Droply is now listed under Settings, Connectors. Open it to see its Tool permissions. Every tool starts at Needs approval, so Claude asks you before each one runs. A good setup is to allow the Read-only tools (Check a subdomain, Check a publish, List sites and Connected account) with the check mark, and keep Needs approval on the Write/delete tools (Publish a website and Publish an HTML page), so nothing goes live without your click.
7. Ask Claude to publish
In a chat, make sure Droply is switched on under the + menu, in Connectors, and ask for what you want. For example: "Publish a one-page site for a coffee shop on Droply." Claude notes that it used the Droply integration and replies with the live link. Ask for changes in the same chat and Claude publishes over the same site, so the link you shared keeps working.
Claude Code
Add the server from your terminal:
claude mcp add --transport http droply https://droply.host/mcp
Then run /mcp inside Claude Code, pick the server, and sign in. Your browser opens the same
Authorize screen, and this time it says access is sent to an app on your computer. Claude Code can then
publish the project you are working on, as long as it is already built.
Other assistants
An assistant that cannot sign in this way can use a token instead. On your
API tokens page, create an AI assistant token
and add it to the assistant's server settings as the header Authorization: Bearer <token>,
with the address above. The token lists your sites and publishes to them, and it works on every plan.
Keep the token in your user settings or an environment variable, never in a project file such as
.cursor/mcp.json that could be committed to a repository. Anyone holding it can replace what
your sites show until it expires after 90 days, or until you
revoke it on the same page.
What Claude can do
- See which account is connected and what its plan allows.
- List your sites, and check whether a subdomain is free.
- Publish one HTML page, or a folder of files: HTML, CSS, JavaScript, images and fonts.
- Update a site you already have. The address stays the same.
- Follow a publish until it is live, or tell you why it failed.
It cannot delete sites, change domains, or see or change billing.
Limits
- One publish from Claude can carry up to 300 files and 8 MB in total, and a single page up to 5 MB. Upload bigger projects as a ZIP from your dashboard.
- Files must be the finished site. Nothing is installed or built for you, so a project that needs
npm installor a build step has to be built first. - To keep Droply fast for everyone, an account can publish from an assistant up to 30 times an hour.
- Sites publish exactly as they do from the dashboard: on the Free plan they carry a small Droply banner and are not indexed by search engines.
Disconnect
Remove the connector in Claude's settings, then sign Claude out under Connected apps on your API tokens page. That cuts its access at once. A connection you stop using also expires on its own after 30 days.
More documentation
- Deploy from VS Code: Zip the current folder and publish it without leaving your editor.
- Capture a page from Chrome: The browser extension that snapshots the page you are on and hosts it.
- Automate with Zapier: Deploy from thousands of apps with no code.
- Deploy from ChatGPT: Ask the Droply GPT to build and publish a page for you.
- All documentation: the full index, including the custom-domain guides.